It's a {Feature Friday} here at CaitsCreates
This week I am featuring the talented Emma from Ruby Murray's Musings.

Every time I visit Ruby Murray I am inspired and amazed by all of Emma's clothing transformations. Please stop by Emma's blog and check out all the other awesome things she has done with hand-me-downs.
Now, here is Emma...
I'm so excited to be featured by the lovely Caitlin, I always check out her great transformations and today I'll be sharing a refashion of my own.
If you've ever checked out my blog you'll know I love to change things up, my Hand-Me-Down Horror series has been all about buying yucky or just plain boring clothes and making them into something I'd be proud to wear. Hack off those sleeves, raise that hemline and bob's your uncle a cute custom piece, for pittence.
So without further ado get your sewing needles and thread out and sharpen up those scissors!

Before, a plain long sleeve Tee from Old Navy, that cost me a wopping $2.60


1. Hack off those sleeves, keeping the cut line as neat as possible, then turn the sleeves inside out.

2. Next cut off the cuff again nice and straight, then cut off the stitching (serged seam) keep this as straight and neat as possible and keep everything.
This is what you'll end up with, don't throw anything out, nothing goes to waste on this project.


Next you'll be making the bows, out of the sleeves (I know, genius right!)
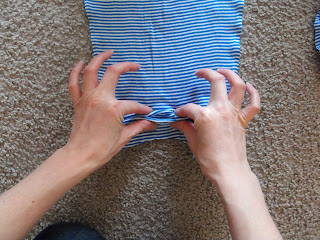
3. Start at the bottom cuff end of the sleeve and slowly pinch your way up, it's a very informal pleat, just basically grabbing finger fulls of the sleeve all the way up until you get to the top and have the entire sleeve pinched between index finger and thumb.


Whole sleeve pinched together

4. Next take the cut off sleeve cuff and wrap it around the middle of the bunched up sleeve, I fanned the sleeve out a little so you can see what it's starting to look like.

5. Keep wrapping the cuff edge around until it's tight and the sleeve is unlikely to fall out.

6. You've just made yourself a cute bow out of a sleeve, now to repeat the process until you have two.

There's a distinct (to me anyway) top and bottom to the bows, the top of the bow will be the rounded edge of the sleeve cap (the top part) just keep this in mind when you come to sew them on.

7. Next we're finishing off the neckline, and for this we're using the two long pieces you have left over from the sleeves, I only kept one so I just sewed the serged piece to the front and it looked fine but if you want to have matching front and back to the tee just continue sewing around the neck.

8. I just used a simple in and out 'running stitch' for the neckline, making sure to line up the serged piece with the neckline edge to make sure it's even.


The finished neck edge, it looks great doesn't it and to think it's just a piece of t-shirt scrap!

9. Next take the bow and making sure the top shorter edge is facing the neck edge line the middle of the bow up with the shoulder seam and simply stitch through the centre of the bow all the way through the t-shirt, I went all the way around the centre piece to make sure it was secure.


That's it, if you want to be extra fancy you could add a few stitches to the bow edges to keep it from flapping around but I've found I didn't need to do this and the bows stayed put. I also left the sleeve edge unturned, you could always turn it under and stitch, personally I liked the raw edge.
So there you are, it shouldn't take longer than an hour even for newbies to sew so even us naptime crafters can make a cute new addition to our wardrobes.http://rubymurraysmusings.blogspot.com/

I hope you enjoyed this awesome t-shirt tutorial {I can't wait to try it!}. A big thank you to Emma at Ruby Murray's Musing for sharing!
Have a wonderful weekend :)
Great make-over!! I might have to try this one.
ReplyDeleteLove those bows! I so will be doing this in the future!
ReplyDeleteThanks so much for featuring me Caitlin xoxo
ReplyDeleteI really hope you try this too :)
OMG this is toooo cute! Thanks for sharing!
ReplyDeleteWow wow wow!!! I am currently turning a few clearance long sleeve t shirts into summer maternity shirts for my niece and this is so perfect I don't even know what to say!!! You are a genius!! I love the bows! And when you said you were using every scrap, man oh man were you not kidding!! I love the detail around the neck!! I bow to your superior talent!! I love your work and I shall follow you to the ends of Goodwill!!
ReplyDeleteLove it! Can't wait to make one myself :-)
ReplyDeleteThis is super cute and I love the idea of bows on your shoulders! I'm so doing this!
ReplyDeleteo my... How I LOVE this!!! I am relly gonna try this one!!!
ReplyDeleteWow this is really cute. Thanks for sharing.
ReplyDeleteRavissant :) Gonna try!!!!!
ReplyDeleteThis is adorable! I want to try this one, too! Thinking might take two different, complimenting t-shirts and try!
ReplyDeleteGreat tutorial!
Great tutorial Caits! Nice to meet you!
ReplyDeleteWOW! You have just single-handedly revolutionised my summer wardrobe! Just made my first of many. Will also do some with my daughter's tees, as she will outgrow them before next winter anyway! What a way to make the most out of her wardrobe. You are clever!!
ReplyDeleteI did it Caitlin Anne! Thanks a lot! My bow was so big that I decided to put only one and in front of the T-Shirt.
ReplyDeleteHey we got a mention on Grosgrain!
ReplyDeletehttp://grosgrainfabulous.blogspot.com/2011/04/tutorials-7.html?utm_source=feedburner&utm_medium=feed&utm_campaign=Feed%3A+blogspot%2Fgrosgrain+%28Grosgrain%29
Super cute top! I am going to try this one myself. Looks very "Anthro" - and that is a huge compliment (In case you were wondering). Cheers!
ReplyDeleteNow, I know what to do with the left over whenever I cut the sleeves off my blouses... Thanks for this great idea! xD
ReplyDeleteSo cute! Thanks for sharing.
ReplyDeleteWow, one of the cutest I've seen in a long while
ReplyDeletei've made one
ReplyDeletelove this and will be stealing it.
ReplyDeleteI just had to comment b/c my name is Caitlin Anne also.... very strange!! hehehe
ReplyDeleteThis is amazing!! love it!!!
ReplyDeleteI'd love to have you share a project on Blissful and Domestic!
ReplyDeletewww.blissfulanddomestic.blogspot.com
New follower:>
ReplyDeletethanks for sharing this post. I really learn a about this post. keep up posting new ideas that would help on other people.
ReplyDeleteI have a white sweater that really needs this! (the seam for the sleeves is way itchy!) =) I'm so glad it can be salvaged, I'd hate to get rid of it! ^.^
ReplyDeleteThis looks like a great and easy transformation for me to do at college without my sewing machine. Thank you!
ReplyDeleteMerci pour ce tuto ! Je l'ai fait, c'est très facile, et le résultat est très beau =)
ReplyDeletehttp://chatonblue.tumblr.com/image/35787041540
I would like to feature this tshirt tutorial on my blog (I have a series titled ~lovely details~ http://heavenlyprincess.wordpress.com/category/details/). May I use the first picture of the shirt in my post? I'll link back here of course!
ReplyDeletejordan
This is totally the one I would copy, it is adorable!!
ReplyDeleteThe architecture of making designs in that t-shit is really great.This is a simple way to make a good designs in t-shirts.This is a highly exclusive range.
ReplyDeletePrint Tshirt
Great details here, better yet to discover out your blog which is fantastic. Nicely done!!!
ReplyDeletecool t shirts
great design for blank t shirts
ReplyDeletePlain T shirts Looking for style Online t shirt?
ReplyDeleteLook no further than a classic plain tee, NEEVOV.com Vertical Integrated Retail online brand plain round neck t shirts.
Finding Kids T Shirts India are easy as prospective clients can surf through the remarkable wide range of items available on the internet and also get their buys provided in their home. In a nation like Indian, where the environment is hot and moist most part of
ReplyDeletethe year t t-shirts, especially pure cotton t shirts are extremely well-known for the convenience they provide.
Karttshirt offers variety of colors, styles and sizes to create an entirely new set of bulk custom t-shirts. The tool we use keeps you ahead
ReplyDeleteof the fashion curve all year round. We give you quicker way to create personalized t-
shirts in the styles you wear every day. All you need to choose the product you want the
print on. Once you finish finding the product, choose the design you want on it and the
font for your text.
So go ahead and Create custom t-shirts. Go play
now, and have fun!
Wao great design.Thankyou for this useful and informative blog, people who are not aware for the designer t shirts online, always waited these type of informative blog
ReplyDeleteJusty Shopping Now - long sleeve shirt :- Ix-seleene is No.1 online clothing and shoe store for Woman in USA, Canada. You can buy long sleeve t shirts, v neck t shirt and designer dresses for Women.
ReplyDeleteBuy T Shirts Online : Buy customized T-Shirts with best designs that suit the taste of everyone. Men T-Shirts and T-Shirts for women, we have the best designs.
ReplyDeleteYou are a genius!I always like t-shirt is different from other people. In imprints-tshirt store, you can add your own picture, slogan and create some personalized design idea on t-shirt.
ReplyDeleteI am very impress to read this informative article. This is very amazing & attractive for all. I would like to visit this excellent post. The suitable post are Simply Southern Tees
ReplyDeleteThank you for this useful and informative blog.
ReplyDeleteBuy plain t-shirts for women's at best price from crazybeta.
https://www.crazybeta.com/women/collections/plain-t-shirts
Hi Nice post,
ReplyDeletePlease have a look at this too Mobile Covers
Wonderful post i really like it send gifts to Pakistan
ReplyDeleteGreat make-over!! I might have to try this one.
ReplyDeletelinen cushion covers uk
geometric pillow colorful
pillow of solid rock
During World War II the T-shirt was finally issued as standard underwear for all ranks in both the U.S. Army and the Navy. Although the T-shirt was intended as underwear, soldiers performing strenuous battle games or construction work, and especially those based in warmer climes would often wear an uncovered T-shirt. Branded t shirts
ReplyDelete